Make your venue 3D
Give a venue plan version its 3D model on the 3D and views tab: upload the model, place anchor seats on it from above, send the version to the pipeline, check how well it registered, look at the stills and 360s, and mark the version live to sign the views off.
A 3D model of the venue gives every seat its view from the seat: what a buyer sees, the distance and angle to the stage, what is in the way, and a rendered still and a 360 from every row. It also gives best available each seat's real view to rank from, and the seat map on a website the venue in 3D, a toggle away from the flat map. The model belongs to one version of a venue plan, like its seats, and it reaches buyers when that version is live.
Before you start#
- A venue plan whose version you want views for. You can set the model and anchors on a draft, but only a published version is rendered.
- Permission to update the venue. Marking the version live, which signs the views off, takes permission to manage the venue (
venues.manage). - The model. A clean model of the room, in metres, as a glTF binary (.glb), or a venue package as a .zip or .tar.gz, up to 5 GB.
- To look at the renders in Backstage, an event that sells from the version, with a date.
Where a model comes from#
Any of these, made into one clean model of the room:
- The venue's architects, from the drawings or the building model they already have, exported as a .glb.
- A laser scan of the auditorium, cleaned up into a model.
- A phone or 360 camera capture, walked round the room and rebuilt into a model.
What matters is that the seating, the stage and anything that blocks a view, such as pillars, balcony fronts and rails, are where they really are.
Upload the model#
- Open Venues, choose the venue and its Seating plans tab, and open the version.
- Choose 3D and views in the inspector on the right.
- Under The venue model, select Upload the model and choose the file. Choose an uploaded one reuses a model uploaded before.
The file goes straight to storage, with its progress and the time left beside it. If the connection drops, Send it again sends the whole file again. When it has arrived, Backstage checks it and sets it as the version's model.
Look at the model from above#
A .glb you upload is also drawn beside the plan as The model from above, read on this computer and not sent again. To look at a model uploaded before, select Open the .glb to look at and choose the same file.
- Heights beside it shows where the model's floors are. Drag From and To to show one level at a time, such as the stalls without the circle over them.
- Drag to pan, scroll to zoom, and Fit the model to frame it again.
- The floor buttons above the plan, such as Stalls and Circle, switch the plan between floors.
A venue package is not drawn: you type each anchor's point instead.
Place the anchor seats#
Anchors tie the model to the plan: a seat on the plan, and the point on the model where that seat stands. About ten, spread over the house, are enough; you can place up to 24.
- Select Suggest seats for a spread of seats chosen for you, front and back, both ends of rows, on every floor. Or click seats on the plan yourself.
- Select an anchor, on the plan or in the list, then click the point on the model where that seat stands: its floor, not the seat back. The point is shown in metres (across, along and up); type it instead for a venue package.
- Do the same for every anchor. The bin removes one.
- Select Save anchors.
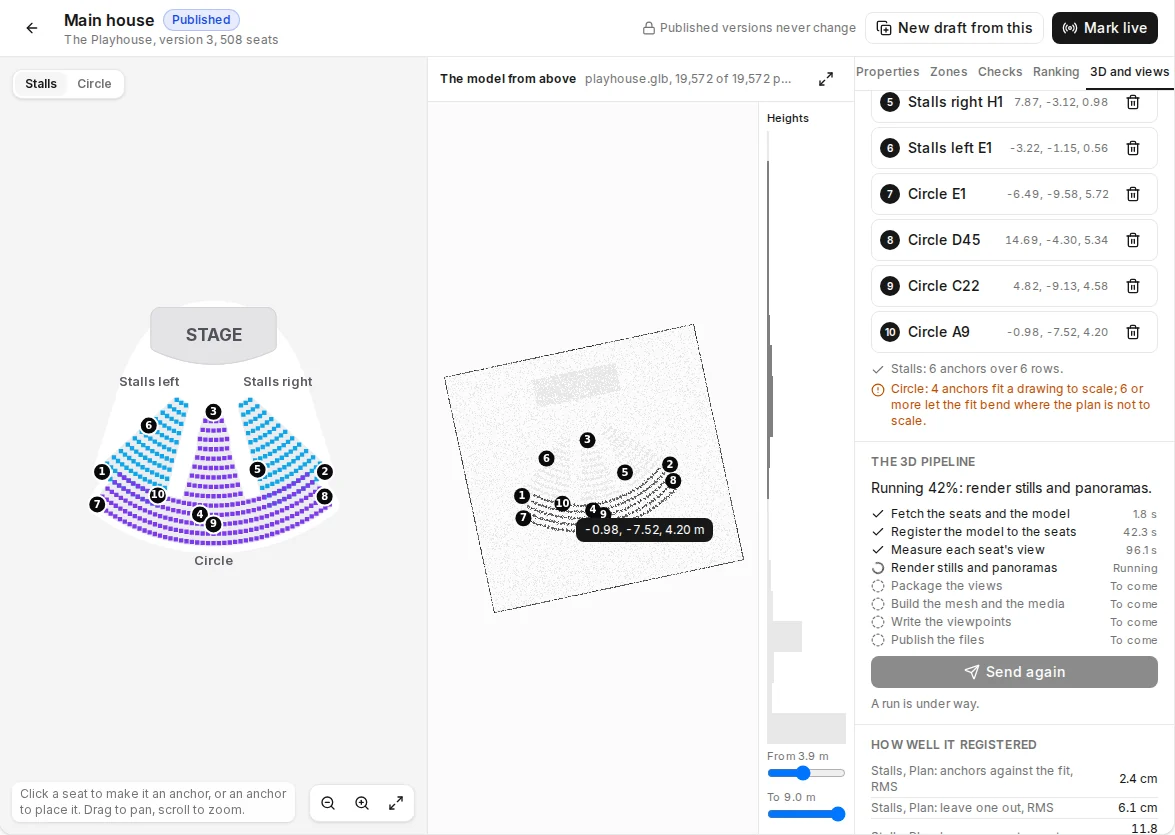
Under the list, the checks say what each floor still needs:
- At least three anchors on a floor, not all in one line, or it cannot be registered at all.
- More than one row, or the rake is guessed.
- Six or more on a floor let the fit bend where the plan is not drawn to scale; with fewer, the plan is taken to be to scale.
- A point for every anchor.
A floor that has what it needs says so, with its anchors and rows.
Send it to the pipeline#
- Publish the version, if it is a draft, and save the anchors.
- Under The 3D pipeline, select Send to the pipeline.
The tab follows the run as it goes, step by step, each with its time when it is done: fetch the seats and the model, register the model to the seats, measure each seat's view, render stills and panoramas, package the views, build the mesh and the media, write the viewpoints, and publish the files. A run waits in a queue until a machine takes it. If a step fails, the tab says which and why; fix it and Send again.
Check how well it registered#
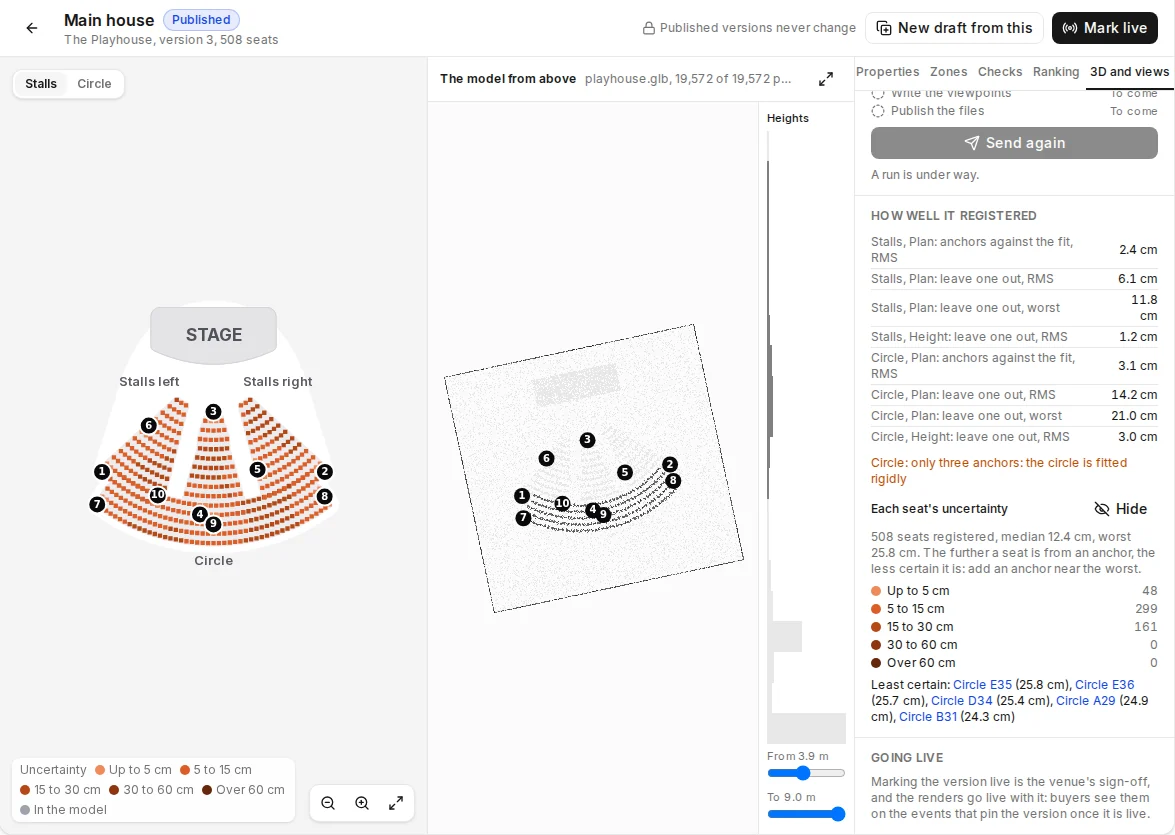
When the model is registered, How well it registered gives the figures for each floor: how far the anchors sit from the fit, and how far each would be if it were left out, as an average and at worst, in centimetres. An anchor out of line with the others is left out and named: check that the right seat was measured.
Each seat's uncertainty says how sure the fit is of every seat: the number registered, the median and the worst, and Show on the plan shades the seats from up to 5 cm to over 60 cm. The further a seat is from an anchor, the less certain it is. Least certain names the worst seats; add an anchor near them and send again.
Look at the renders#
When the run has finished, The renders counts the row stills, the seat stills and the panoramas. With a date of an event that sells from the version, it shows them: select a row's still to open it larger, and drag a row's 360 to look round. Without one, it lists the files.
Mark the version live#
Marking the version live is the venue's sign-off, and the renders go live with it: buyers see the views on the events that pin the version once it is live. If the version is live already, the renders go to buyers as they land, on every event that sells from it.
The seat map buyers use on a website, the seat explorer on the page or in the buy modal, then offers the venue in 3D as well: a toggle beside its zoom buttons shows the levels with every seat where it stands, and loads the model only when a buyer presses it. Add a seat map to your site shows what a buyer gets.
Select Mark live at the top of the editor, or on the version's row in Seating plans.