Make a basic seating map
Draw a venue's seating plan in Backstage: blocks and rows, aisles, pillars and labels, zones and the rake. Publish it, mark it live, then put an event on it with price categories, production kills and holds.
A seating map is two pieces of work. The venue draws its seating plan once, under Venues, and marks a version of it live. Each event then pins that live version under its own Seating and lays its prices, kills and holds over it. Seating and inventory explains why the two are kept apart; this page is the clicks.
Before you start#
- A venue in Venues, with its name and address.
- Permission to update the venue, to draw, save and publish a plan. Marking a version live takes permission to manage the venue (
venues.manage), so the venue signs off its own room; an owner or admin of the venue's account can grant it. - For the second half, an event at that venue with at least one date, and ticket types on its Tickets page.
Create a seating plan#
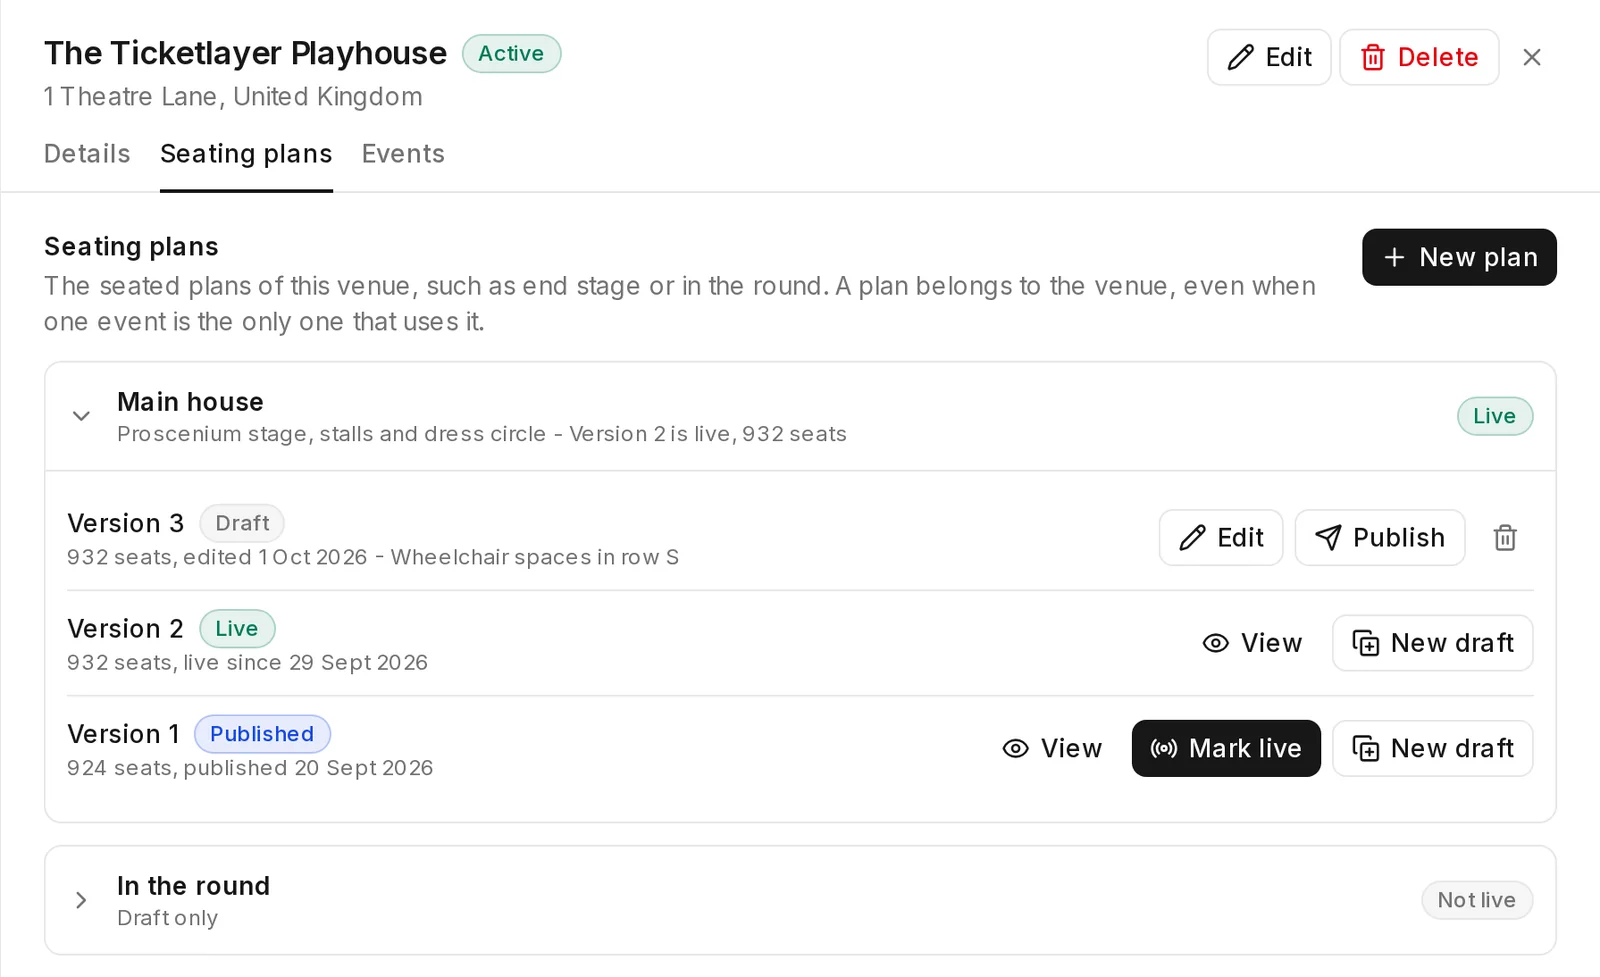
- Open Venues, choose the venue and open its Seating plans tab.
- Select New plan. Give it a name for the configuration, such as End stage or In the round, and a description of when it is used.
- Select Create and draw.
The plan starts as a draft, version 1, with one floor called Ground, a stage, and two zones to paint with, Standard and Premium. The editor opens on it.
Find your way round the editor#
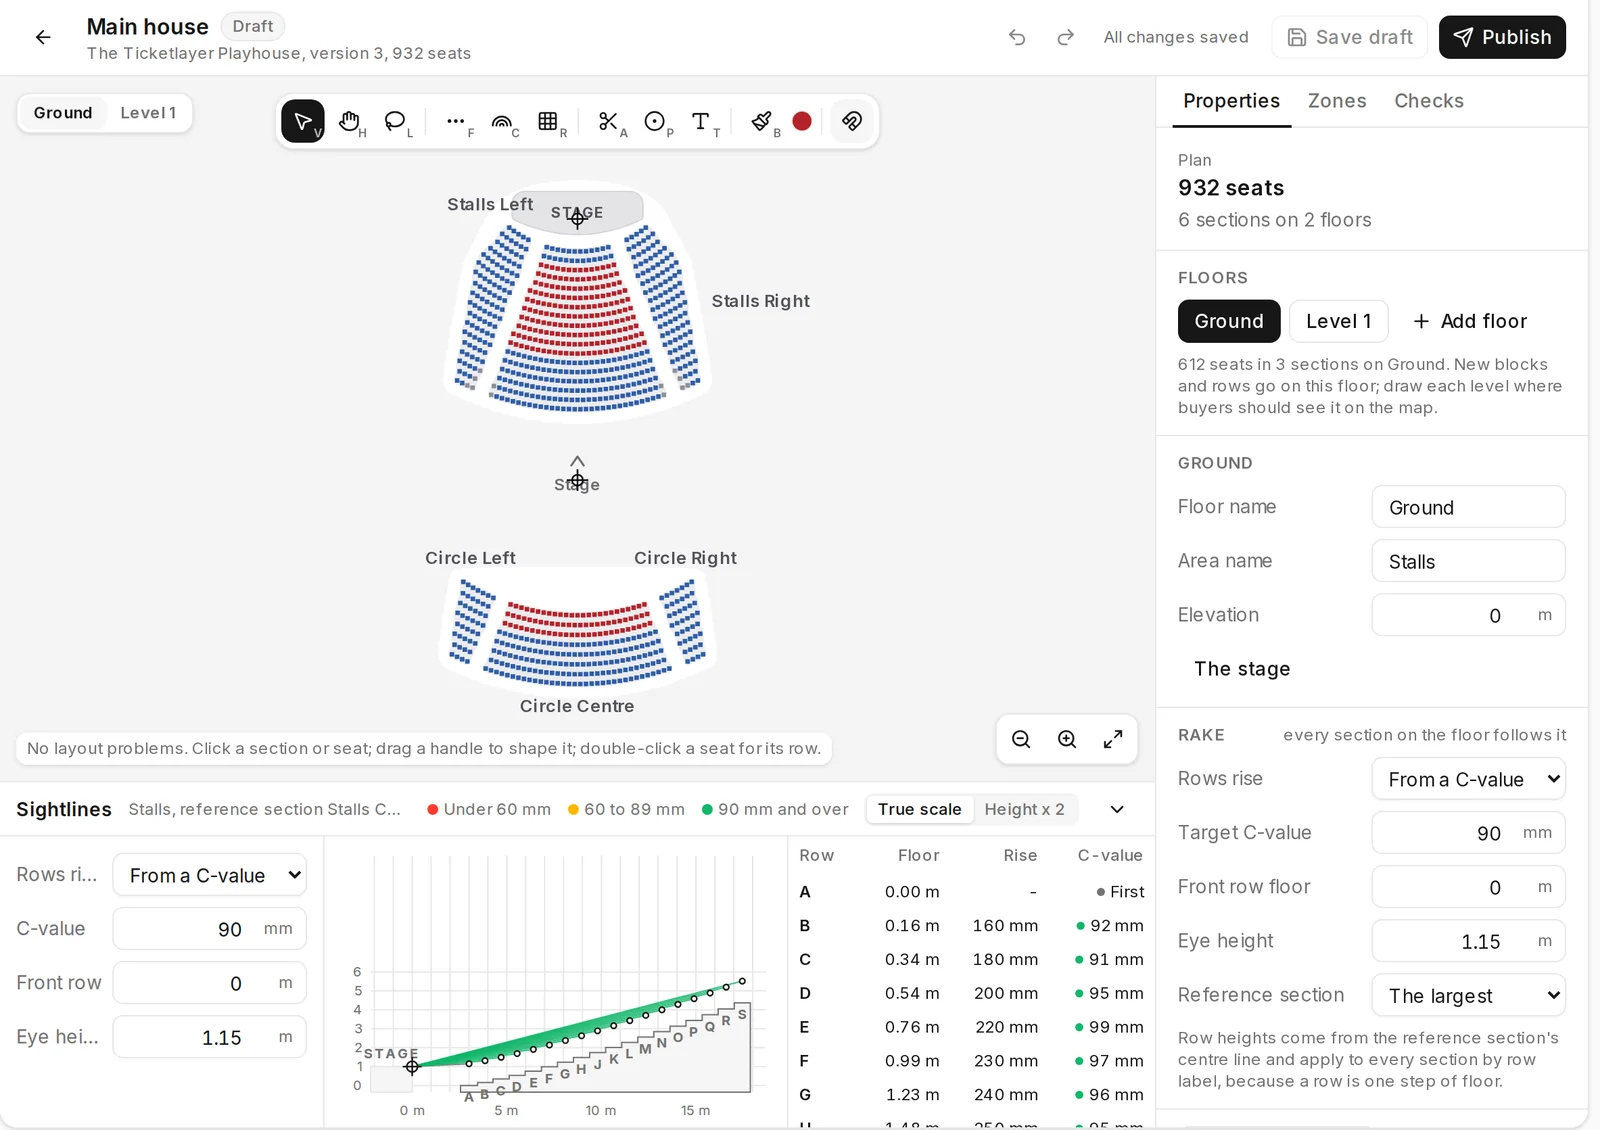
The canvas is in the middle, with the tools across its top and the floors at its top left. The inspector on the right has three tabs: Properties for whatever is selected (or the plan, with nothing selected), Zones and Checks. The Sightlines panel sits under the canvas.
| Tool | Key | What it does |
|---|---|---|
| Select | V | Select a section, a seat, the stage, a pillar or a label. Drag to move it, or drag its handles to shape it. Double-click a seat to select its whole row. |
| Pan | H | Drag to move round the plan. Scroll to zoom. |
| Lasso | L | Draw round seats to select them. |
| Row | F | Drag from one end of a row to the other. |
| Curved block | C | Click where the block's front row goes. |
| Straight block | R | Click where the block's front row goes. |
| Aisle | A | Drag an aisle across the seats it takes out. |
| Pillar | P | Click to place a pillar. |
| Text | T | Click to place a label. |
| Paint zones | B | Drag over seats to paint them in a zone. |
Ctrl+Z undoes and Shift+Ctrl+Z redoes (Cmd on a Mac). Ctrl+S saves the draft. Ctrl+D duplicates the selected section. The arrow keys nudge a selected section, aisle, pillar or label by 10 cm, or 50 cm with Shift, and Delete takes it out. The snap button at the end of the toolbar snaps what you draw to 10 cm, or 50 cm with Shift held.
Draw blocks#
A block is a section of seats: Stalls Centre, Circle Left. Its name is the one buyers see on the map, so name it as the venue's own signs do.
- Choose Curved block (C) for rows that arc round the stage, or Straight block (R) for straight rows.
- Click where the block's front row goes. The block appears as Section 1, Section 2 and so on, selected, with the Select tool back in your hand.
- Drag its handles to shape it. A readout beside the pointer says what the drag is setting.
- In Properties, give it its name and set the numbers exactly:
- A curved block has Rows, Row depth, Seat pitch, Front row radius, a Start angle and End angle, and Aisles inside with their Aisle width. It arcs round the stage, and its Arc centre moves the curve.
- A straight block has Seats per row, Rows, Row depth, Seat pitch, Facing in degrees, and Stagger every other row.
- Choose the block's Zone, the default price area every seat in it starts in.
For a block on the other side of the house, select the first and choose Mirrored copy; Duplicate makes a copy beside it.
Shape the outline#
Every section has an outline: the shape buyers see and tap on the seat map. It is drawn round the seats until you change it.
- Select the section and choose Edit outline under Outline in Properties, or double-click the section.
- Drag a point to move it, drag a midpoint to add a point there, and double-click a point to remove it.
- Choose Done, or press Escape.
Reset to the seats throws the drawn outline away and draws it round the seats again.
Draw single rows#
A row on its own is for the seats that are not a block: a box, a front row added in front of the stalls, a line of seats along a wall.
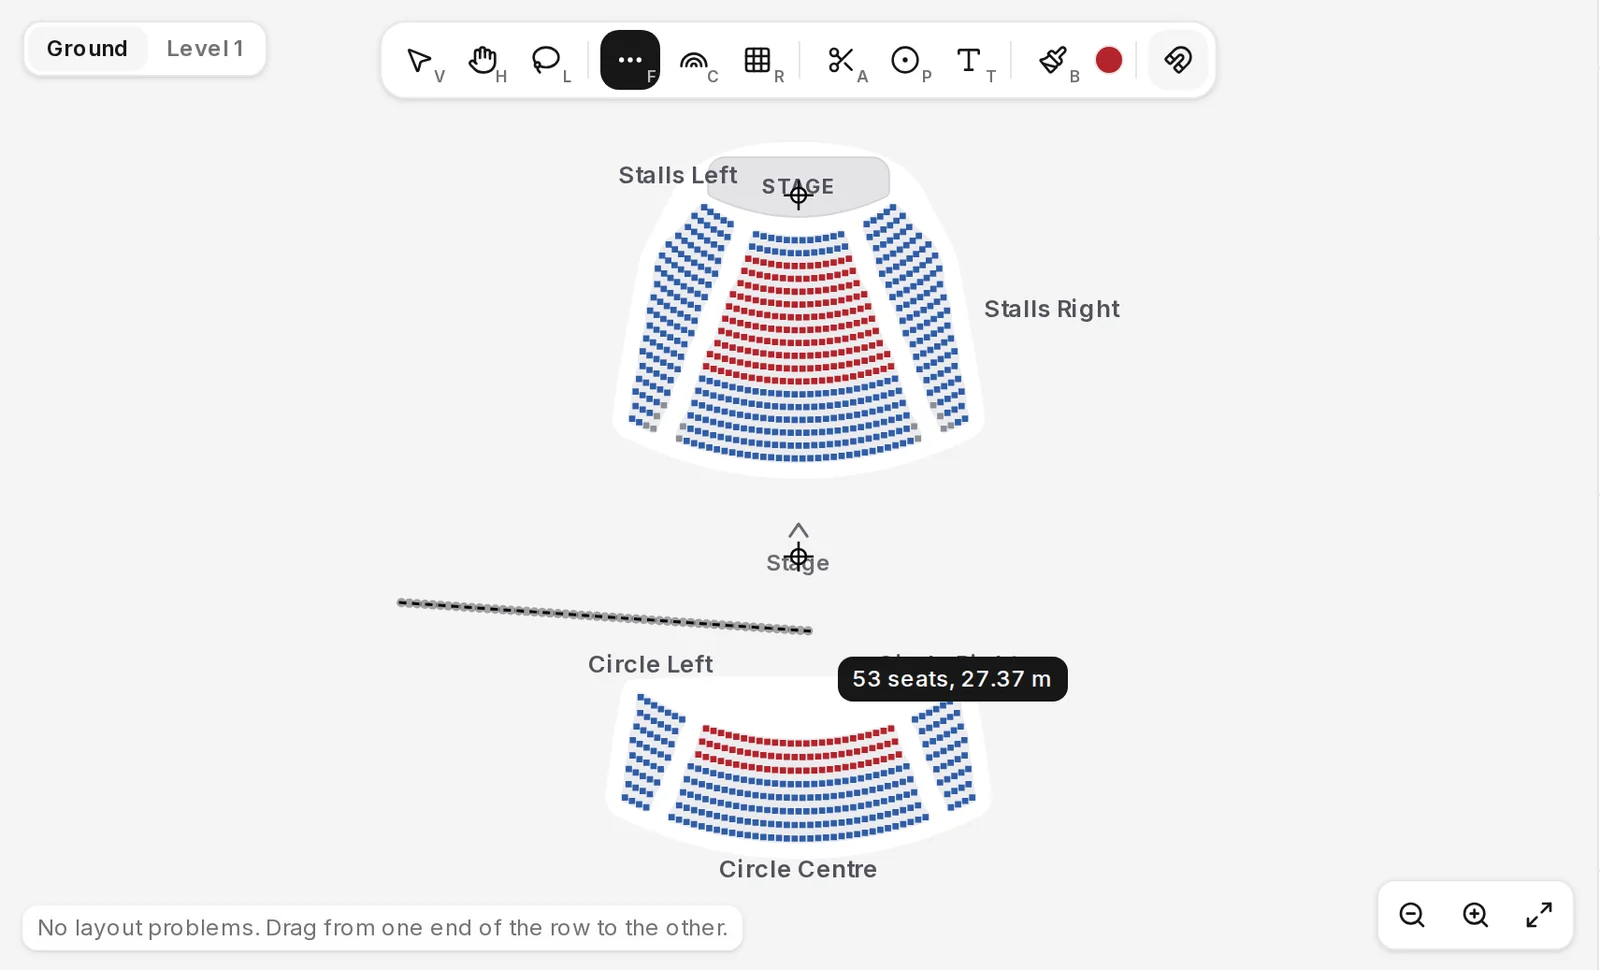
- Choose Row (F).
- Drag from the first seat to the last. The readout says how many seats fit and how long the row is.
- Release. The row appears as Row 1, Row 2 and so on.
- To curve it, drag its middle handle, or set Curve in Properties. Seat pitch sets the space each seat takes.
Number the rows and seats#
Select a block or a row and set its labels in Properties.
- Row labels: the Scheme (A, B, C with no I; A, B, C with no I or O; AA, BB, CC; 1, 2, 3; or a custom list), the First row, and Letter from the back row forwards where the venue letters that way.
- Seat numbers: Left to right, Right to left, Odd right, even left, from the centre, or Continuous across sections, which numbers every section on the floor set to it as one run, row by row from the audience's left. Start at sets the first number.
Add aisles, pillars and labels#
- Aisle (A): drag it across the seats it runs through. Every seat it crosses is left out, and the seats either side become aisle seats. Set its Width in Properties.
- Pillar (P): click where it stands. The seats under it are left out. Set its Radius in Properties.
- Text (T): click to place a label, such as Sound desk or Exit, then type its Text and set its Letter height. Labels are for the people working on the plan in Backstage.
- The stage: select it and drag it into place, or set Left, Back, Width, Depth and Stage height in Properties. Every sightline on the floor is worked out to the middle of its front edge, at stage height.
To mark seats rather than draw them, select them (click, Shift-click, or the Lasso) and use Mark as in Properties: Wheelchair space, Companion, Restricted view, or Removed for a seat that is not there. A removed seat stays on the plan as a ghost, so it can be put back by selecting it and choosing Removed again.
More than one level#
A circle or a balcony is a floor of its own. In Properties, with nothing selected, choose Add floor: the new floor starts 5 m above the one you are on. Give it its Floor name, Area name and Elevation, and draw its blocks where buyers should see that level on the map. The floor buttons at the top left of the canvas switch between floors; new blocks and rows go on the floor you are looking at.
Paint the zones#
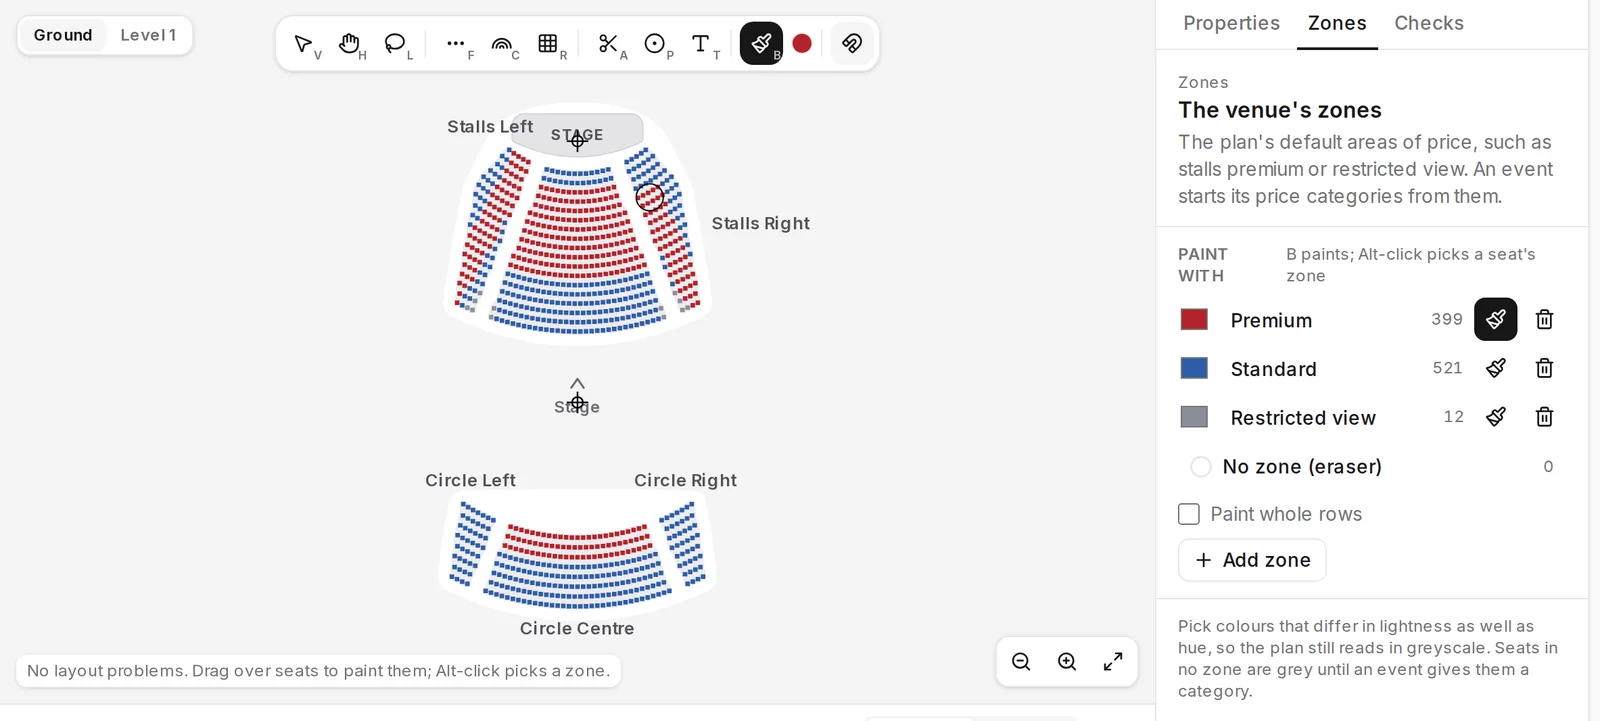
Zones are the venue's default areas of price, such as stalls premium or restricted view. An event can start its price categories from them, so painting them here saves every event the same work.
- Open the Zones tab. Rename a zone by typing over its name, change its colour from its swatch, and use Add zone for more.
- Choose a zone's brush, or press B. Drag over seats to paint them. Alt-click a seat to pick up its zone.
- Tick Paint whole rows to paint a row at a time.
- Paint with No zone (eraser) to take seats out of every zone.
Pick colours that differ in lightness as well as hue, so the plan still reads in greyscale. Seats in no zone are grey until an event gives them a category.
Check the rake#
The rake is how much each row rises over the one in front, so everyone sees the stage. It is set per floor, and every section on the floor follows it by row label, because a row is one step of floor.
- Select nothing, and in Properties find Rake.
- Set Rows rise: From a C-value to work the rise out for you, or By a fixed rise to give every row the same Rise per row.
- For a C-value, set the Target C-value in millimetres: how far each row's sightline to the stage clears the head of the person in front. 90 mm is a good sightline; 60 mm is the least to aim for.
- Set the Front row floor height, the seated Eye height (1.15 m by default), and the Reference section, the section whose centre line sets the heights (the largest unless you choose another).
The Sightlines panel under the canvas draws the floor's rows in section, each with its sightline to the stage, coloured by how well it clears: red under 60 mm, amber 60 to 89 mm, green 90 mm and over. Its table lists each row's floor height, its rise over the row in front and its C-value. Height x 2 stretches the drawing upwards to make a shallow rake easier to read; True scale puts it back. The panel takes the same settings as Properties, so you can change the rake while you watch it.
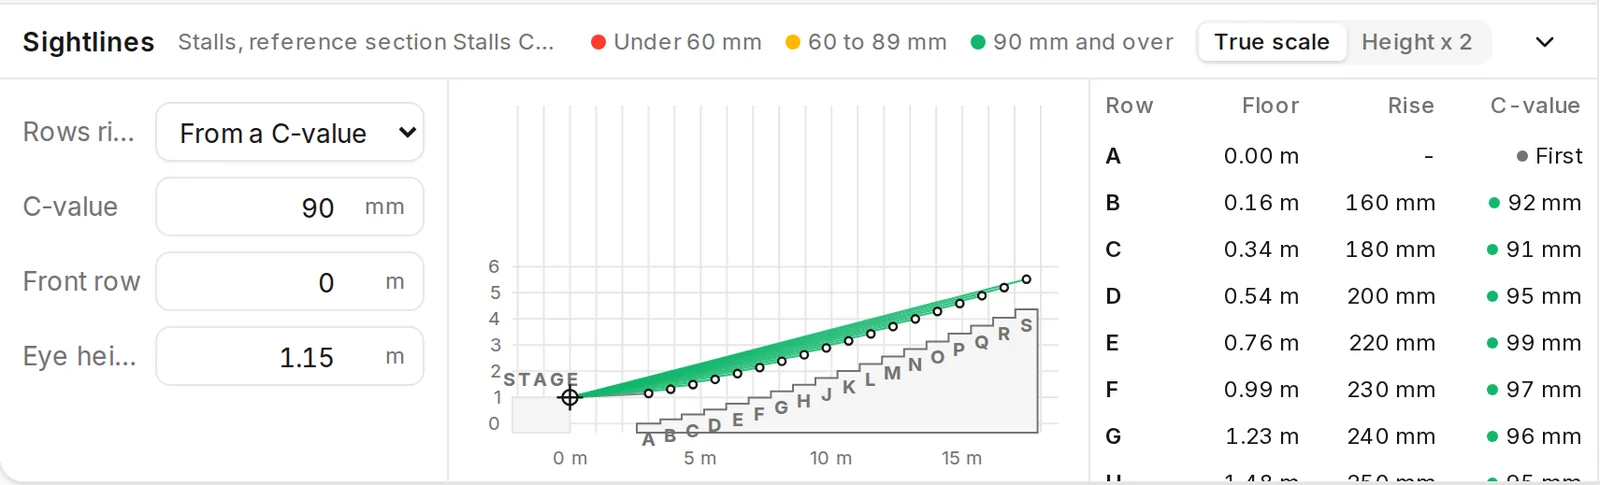
A floor needs a stage for its rake to have something to look at; without one the panel says so.
Fix what the checks report#
The line at the bottom left of the canvas says how the plan stands: "No layout problems", or how many things there are to fix or to check. The Checks tab lists them. Select one and the editor selects the seats or the section it is about.
- Fix is an error, and a version with one cannot be published: a plan with no seats, two seats in one section with the same label (change the numbering or the row labels), or seats closer than 42 cm to each other (move the blocks apart).
- Check is a warning worth a look: a section or a row with no seats (widen it, or move it clear of aisles and pillars), seats outside their section's outline, where a buyer cannot tap them (edit the outline or reset it to the seats), seats in no zone, or rows that clear the head in front by less than 60 mm (raise the C-value or the rise per row).
The tab also counts the plan's rows in each sightline band, poor, fair and good.
Save, publish and mark live#
- Select Save draft, or press Ctrl+S. The top bar says "Unsaved changes" until you do, then "All changes saved". A draft can be saved, closed and opened again from the venue's Seating plans as often as you like.
- When the plan is right, select Publish. Publishing saves the draft first. If the checks found an error, the editor lists it and does not publish. A published version never changes again, and publishing does not make it live.
- Select Mark live, in the editor or on the version's row in Seating plans. This takes permission to manage the venue. The plan shows Live, and new events at the venue pin this version.
To change a published plan, select New draft on its version: a copy as the next version, to draw on and publish in its turn. Marking a later version live does not move an event that already pinned an earlier one.
Put an event on the plan#
- Open Events, choose the event and open Seating.
- Under Sell this event seated, choose one of the venue's plans. A plan with no live version cannot be chosen yet: publish a version and mark it live first.
- Leave Start the event's categories from the plan's zones ticked to begin with a category for each zone, its seats already painted.
- Select Sell seated from this plan.
The event now sells from that version. The page says which, with a link to look at the plan, and has three tabs: Categories, Production kills and Holds.
Paint the price categories#
A price category is what a seat costs: Premium, Standard, Restricted view. Every seat buyers can buy is in one.
- On Categories, type a name under the list and select Add. Change a category's colour from its swatch; buyers see that colour on the map.
- Choose a category's brush and drag over seats to paint them. Or pick seats with Select or Lasso and choose the category from the buttons under the list.
- Paint with Not sold, or choose it for selected seats, to take seats off sale on this event.
- Price each category on the event's Tickets page.
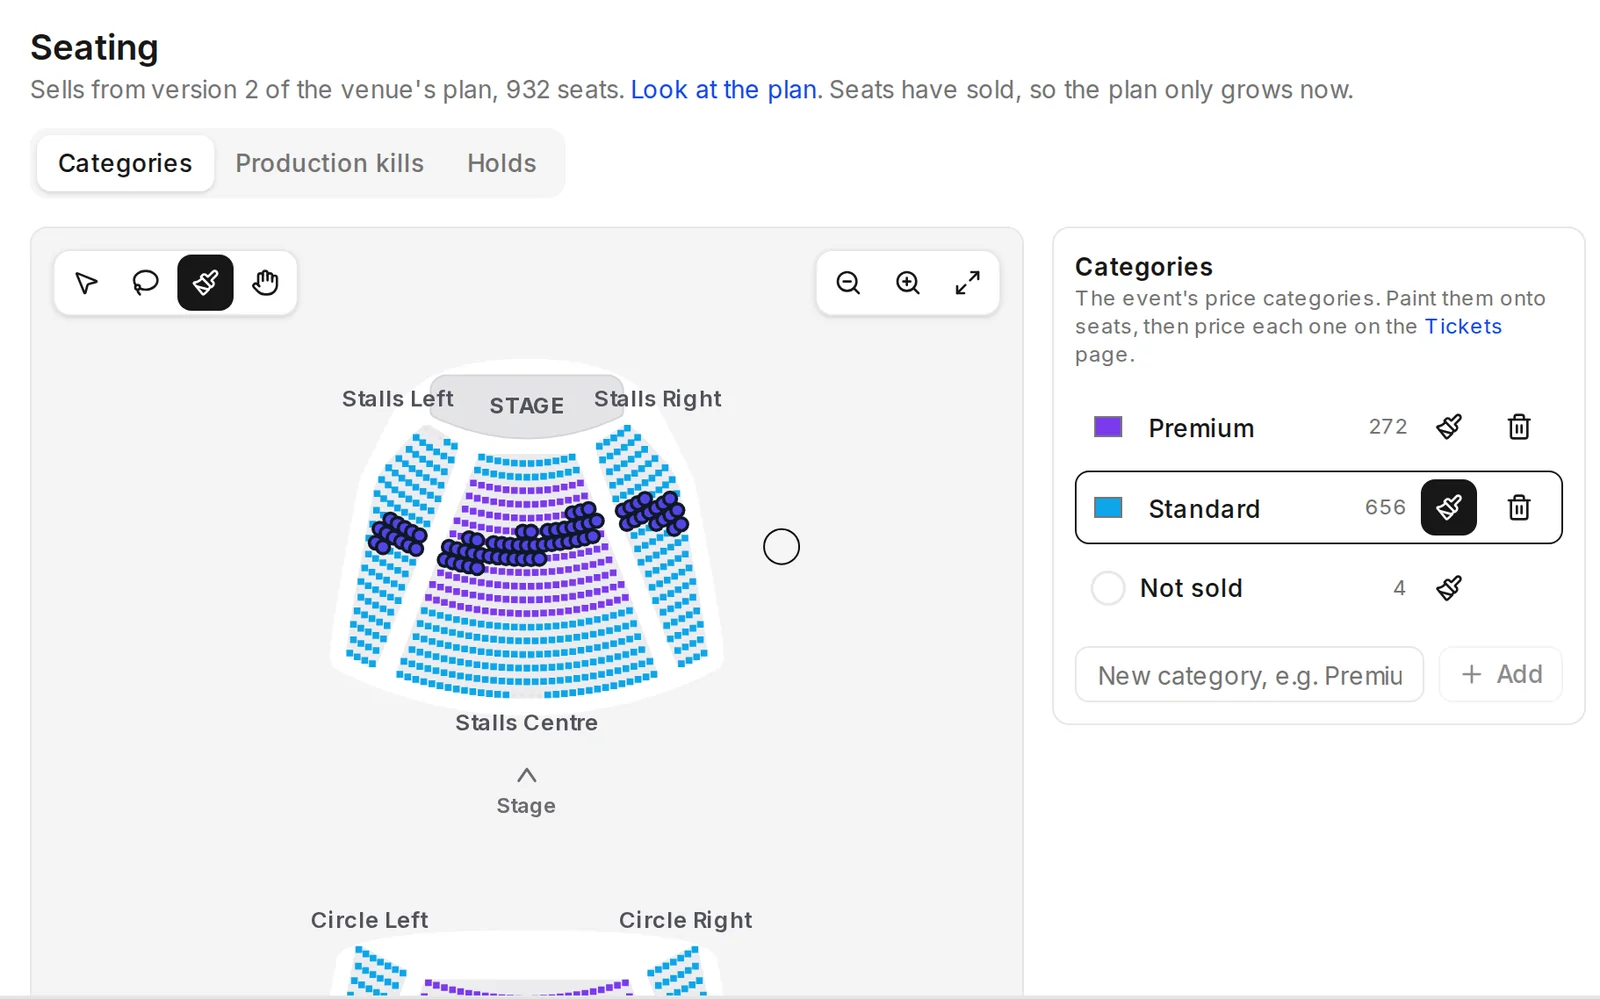
Until the first sale, categories can change freely. Once seats have sold, the page says so and the plan only grows: a seat that has a category keeps it, and a category in use stays.
Kill seats for the production#
A kill takes a seat out of sale on every date of this event: a camera position, the sound desk, a seat the set blocks.
- Open Production kills and select the seats with Select or Lasso.
- Say why, if you like, such as sound desk.
- Select Kill. The seats are not sold on any date of the event.
Lift kills puts selected killed seats back on sale, and Select the killed seats finds them all.
Hold seats for a date#
A hold keeps seats back on one date under a name, until you release them.
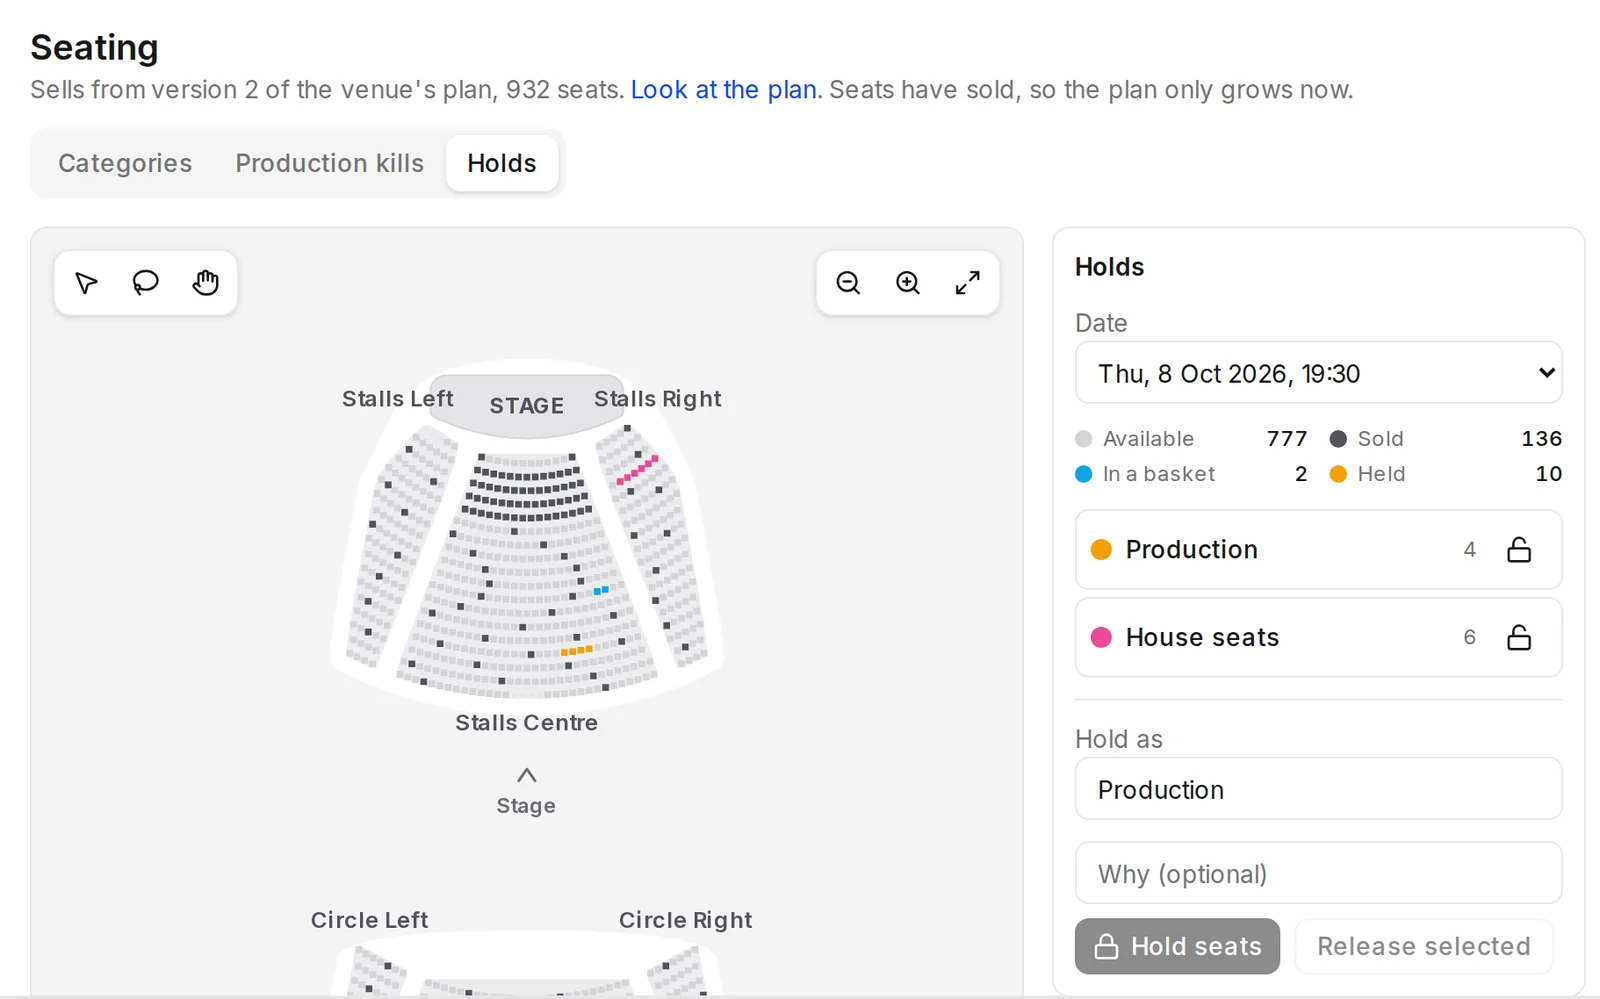
- Open Holds and choose the Date. The counts show the date's seats available, sold, in a basket and held.
- Select the seats.
- In Hold as, choose Production, Promoter, House seats, Access or Press, or type a name of your own, and say why if you like.
- Select Hold.
Each hold is listed with its colour and its seat count. Select its name to select its seats. Release selected releases the selected seats from their holds, and the padlock beside a hold releases all of its seats.
What buyers see#
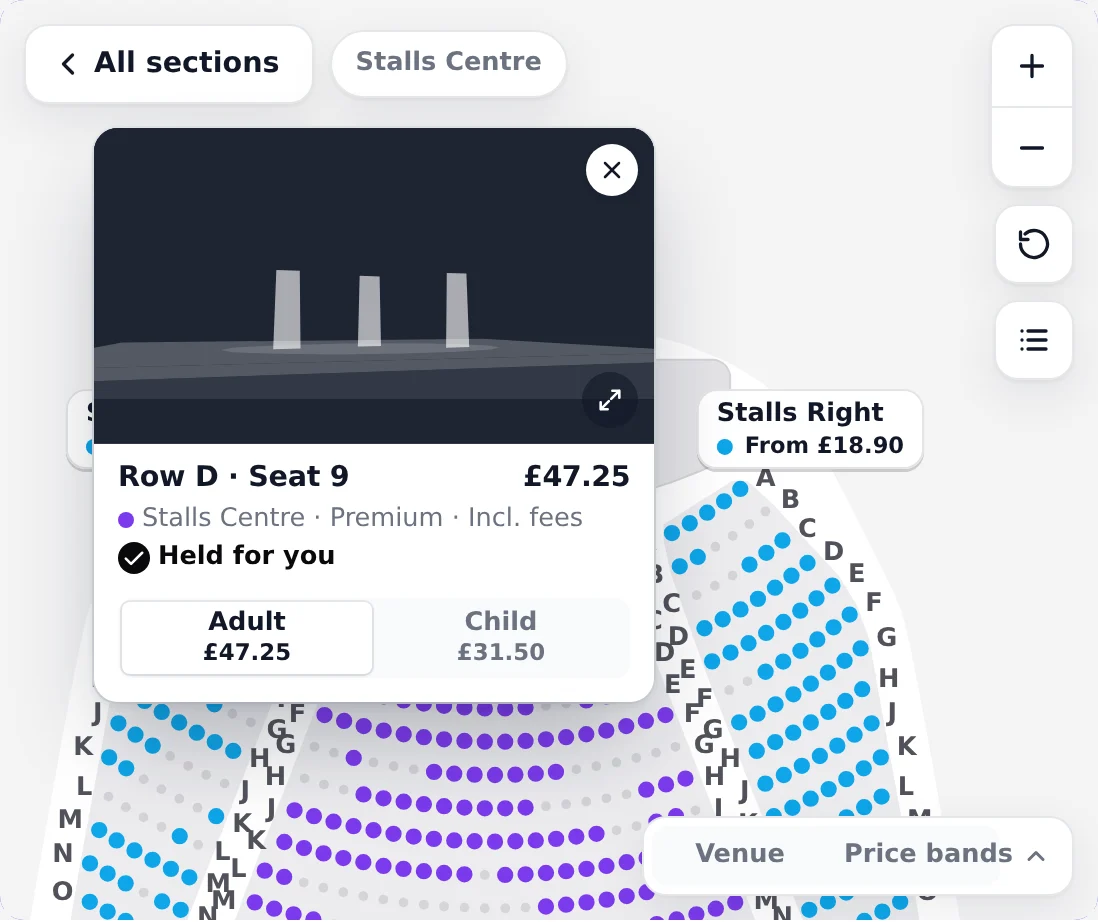
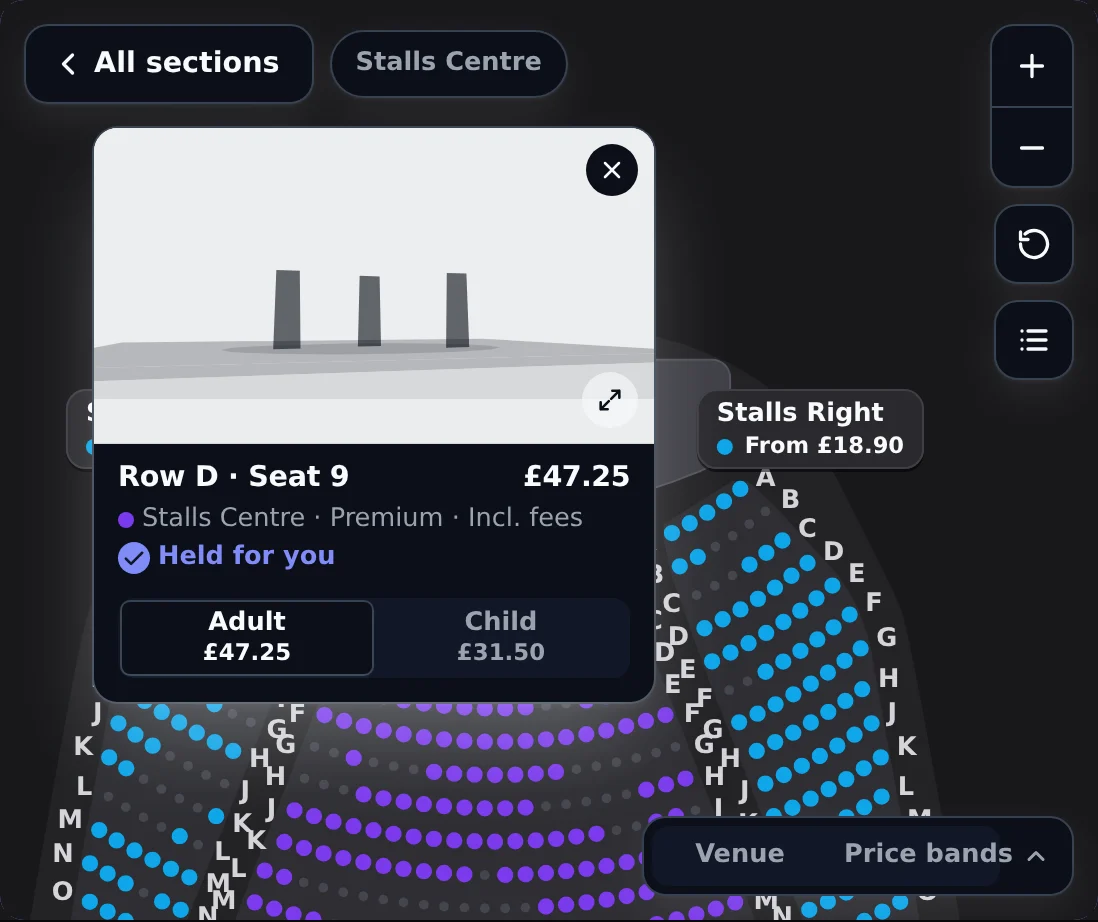
On your website, the seat map is <tl-seat-explorer>, on its own page or in the buy modal's Seats step. It draws the sections you named, the stage, and every seat in its price category's colour. Killed seats and held seats are never offered for sale, and seats in no category are not sold.
<tl-map-key>shows each category's colour and lowest price, and a minimap of the sections.- A tap reserves a seat on the first ticket type on sale for its category on that channel, in the order of the event's ticket types, and pins
<tl-seat-card>beside it, with the row and seat number as you labelled them, the section, the category and the price. <tl-price-picker>changes the seat's ticket type among the types its category is priced for, without letting go of the seat.
Add a seat map to your site puts it on your website: the channel's allowed origins, the buy modal or the explorer beside the cart, and the theme.